
Painted couch tutorial !

There is a lot of interest online for upcycling at the moment – this is something I have been passionate about for years …my whole house is full of restored pieces so I thought it might be helpful to share a few of my experiences, successes and fails!. My friends used to think I was crazy to spend so much time on an old piece rather than buy it new but I have an attachment to things that were once loved . Moreso than a new pair of shoes or jewellery, furniture and antiques are my ‘thing’ ..I always wonder about its history and where it came from, who may have owned it once. My finds are either upcycled for my daughters bedrooms or as photoshoot props for my business ‘Boudoir Girls’ . Since the recession I have witnessed a trend for it which is amazing. I am so inspired by how many people are having a go and creating wonderful pieces! Naturally there are fails too! I tried a painted chair with these steps but failed due to the fact it was a different jacquard fabric.I will blog this at some stage and show what eventually happened to it. It got another lease of life and looks really cute! The velvet worked well with this method so I would stick to that fabric.
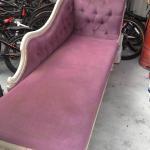
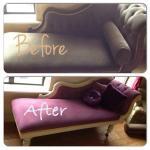
So, onto the painted couch! I bough this piece of a lady on done deal it was brown and boring….but a stunning piece with history and perfect for my photoshoots! I was torn between covering it in new fabric professionally or trying out a painted look on it. So I went with the latter and I was glad I did. I would not recommend this to anyone using a brand new piece or mammy best couch..I knew if it did not work I would get it recovered properly. Lucky for me it came out just as planned!
What I used: Water in spray bottle, emulsion (normal matt house wall paint in a colour you like) I used a bright purple but I knew it would come out darker with the underneath colour being dark brown/grey. If it was white it would have been a very different shade. You will also need a nailbrush or hard paintbrush to scrub couch between layers and a cloth for any messy bits.
Remove any fluff and grime from sofa, Tape off any areas you don’t want covered in splashes of paint.
Dampen the couch with the spray bottle of water
Mix a tub of 3/4 paint to 1 quarter water and get it to a plyable mix
Use large paintbush to coat the couch (it took quite some elbow grease) rub into all creases and folds
Get the cloth and rub it in more till it looks a bit even (first layer always looks uneven anyway so don’t panic!)
Let this dry then get that nailbrush and scrub the paint so that its not so hard (paint hardens fabric but you want it to still be soft) This bit is very dusty! A facemask helps here! Don’t scrub too hard just enough to take off the hard bits but not the overall paint you applied.
Once dried repeat other steps again once again rubbing it afterwards so that it doesn’t feel like you are sitting on a bed of nails! The fabric on this piece was velvet so I wanted to retain that feel as much as I could.
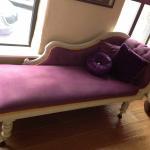
Layer 2 builds the colour better you will see progress. I loved this second layer and decided to keep it powdery and old looking rather than perfectly one colour (though I could change m mind someday and oomph it up!)
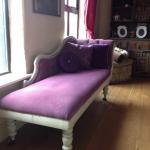
Once that dried I repainted the actual timber on the couch white with emulsion also. I don’t mind pieces chipping off as I want that shabby look but you could seal it well if you want to maintain it better. I also hotglued on a gold trim I have in my box of hoarded fabrics and trims which finished it nicely.
So that is my lazy version of the #paintedcouch – you can seal the couch with a protective spray if wanted – I did not as I am fickle and may change the colour eventually. I use it for photoshoots all the time and its a perfect prop. I just don’t allow the kids to drink tea or juices on it ! Spillages would be a problem if not sealed. Hope you found this helpful I would love to hear any thoughts on it or other painted couch successes!
#paintedcouch #diy #preloved #upcycle #diy #girlydiy #shabbychic #paintedcouchtutorial #howtopaintacouch

